

With the increasing love for wigs, the demand of wigs are also increasing. Many fans who love wigs may be curious about the production process and techniques of wigs. Today, let's take a look at the process of how to make a lace closure wig. The production steps are mainly divided into the following steps:
Firstly you should remove the seal and paint it with a craft store pin, a T-pin is better as it won't hurt you. Set your hair down with a little water first to make sure the seal is as smooth and flat as possible. If you like to braid and cut your hair, you can add more pins to the front. Then use a bent needle and some thread, any type of thread will do. Run the thread through the mesh hole and then through it about an arm's length. Then then pull it off and tie the knot. It doesn't matter how you tie the knot, you just need to tie the knot now.
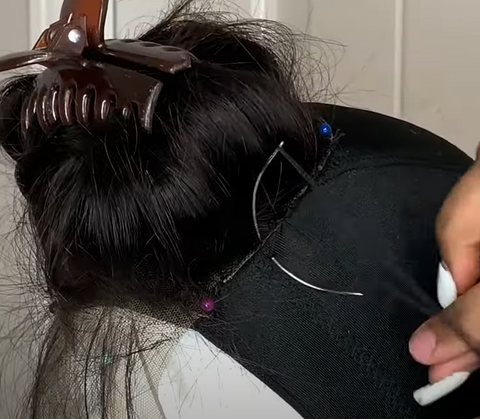
Then run a needle through the edge of the lace, pick up a small mesh before pulling over, open the thread and pull it through. Then you can repeat the edge of the lace closure, pick up some mesh and tie a knot. Continue to sew the edges of the seal while picking up a small mesh around the perimeter to tie the knot. Wrap the thread three times around the needle as you need it to sew tight as you sew your closure. This way when you're done you cut the hat under it and you don't want it to be erratic so you just have to finish the closure exactly. Cut the thread and tie another knot or two, now trim off the excess. Now start your first hair piece, which is also the longest piece, just above the end of the cap. Then take about 7 to 8 inches and secure it, you can use small pins. You only want to sew on it through the mesh of the strap, not through the elastic.
Now begin the stitching process. First you have to thread through each layer of the wig. Pick up some mesh at the top of the strap instead of going through it, this is the first stitch. First stitch closed, pull it through the loop, then pull it again to tie the knot. You should run the thread straight through without knots, sometimes three loops around the needle. But the less circles you make, the more you should sew it. This way it doesn't come loose as getting closer to the end makes the stitch tighter before flipping it. That way it's nice and secure when you flip it, and it'll be flat. Then pull the cap forward to make sure it's not rolled up and that it will fit perfectly when it's done. Then continue to sew the second row, layer by layer.
Then you can have the needle straight up between the four tracks, because remember it never leaves it, not just between loops and pulls. You want to make sure the stitching is always tight, not before and after flipping the track. This is the biggest factor in determining whether your wig lays flat, so you want to get it right. When you run out of thread, you can continue to cut it, tie a knot or two, and then cut again.

